Sunday, November 20, 2022

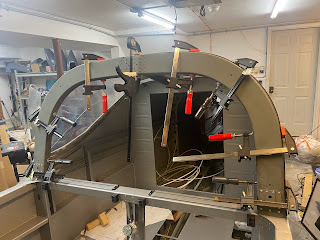
Canopy work - Continues!

Over the last few weeks a number of things have happened with the build. 


I ordered the Engine and Propeller before one of the recent price increases. I asked for both to be pushed to the end of the line for manufacturing (a common request for Vans and not always possible). 


The news is that the propeller has now arrived. I want to keep the packaging in as original a state as possible so I opened the box enough to verify that there is a prop in there. 


The engine is still scheduled for December 2023 which should be fine, as I will work on the avionics and everything else prior to that. 


The canopy has been enjoyable for the most part except now I am entering the frustrating phase. During the construction process I was confident that there was no detectable twist based on the measurements during the riveting of the canopy frame. I was always skeptical about the accuracy of this measurement as things move around, and you are measuring very small deviations. Also it requires that your work surface, etc are all leveled very well which has always been a challenge. 


I moved the airplane into the driveway so I could have enough vertical clearance to attach the canopy frame. I needed to clean out some of the bushings to slightly increase their diameter and allow the canopy pins to engage. Once that was done the canopy went on, and I was able to lower it. I have heard of people having issues lowering their canopies due to the amount of force needed but grabbing the frame by the handle mine engaged smoothly even with the newer upgraded shocks (more force needed to lower). 


The bad news is that it looks to me like there is a twist in the canopy frame as there is a 3/8" gap on the left side and not on the right. I am hoping that I can twist or bend it slightly to make it more flush and/or fix it up during some of the other processes. I am not building another canopy frame and it really isn't too bad from what I can tell.  There was no binding at all on the forward skin, not even close which was interesting given all the warnings in the instructions. 


One more miscellaneous item I am working on is the JD AIR latch. I really like the way it engages and looks but if I were to do it all over again I may think twice about it for the 14. I say this because it does not sit exactly flush due to the slight curve of the fuselage, and also the need to modify it for the 14.  Don't get me wrong, it is a beautiful part, but it does require quite a bit of fitting to get it right and even then it is not exactly precise. Could also be my skill level but I have seen other builders mentioning this as well. 


Thursday, October 27, 2022

Canopy work continues

 I have been working on the beginning of chapter 38 and am now at the point where I am about to rivet the top of the canopy frame together. 

The instructions consist of lots of final drilling, taking apart, deburring, checking for twist, etc.

Surprisingly I have very little twist in the structure and did not have to really adjust at all. This was somewhat surprising given that usually you have to take twist out of many of these curved structures. 

Initially the fluting of the side rails seemed like it would be an issue but it also turned out to not be.


Monday, September 5, 2022

Attended the AEA Class in Kansas City

 Around a month ago I attended the AEA Experimental Electronics wiring class in Kansas City, MO. It was totally worth it just to orient myself better with the wiring skills although it is really just a quick overview class.  It did solidify my decision to go with an all Garmin panel although I really was convinced already. I went to Oshkosh this year to take a closer look at the other vendors and it really did re-enforce my decision as well.


Rollbar installed, rear window fitting


This post will serve as a catch up post for what I have been working on over the last couple of months since the finish kit came in. In addition to this post, I also have worked on the Elevator and Aileron controls as well as the brake lines that I purchased from Aircraft Specialties.

The roll bar section was straightforward, and you really do need to ensure that the structure lacks twist by assembling it on a table however all of that is spelled out. No complications at all occurred. 

 I painted the interior of the aircraft with Rustoleum hammered silver paint, which is good enough for what I am trying to accomplish and my backup plan which I don't think I will need will be to get panels to add to the interior at a later date. It came out fine.

The elevator and aileron assembly was straightforward as well however the controls seem to be binding up a bit, I have chosen not to troubleshoot right now and will look more at it when I get to actually aligning them. I am moving on to the canopy work at this point before the winter really arrives and plexiglass work becomes more difficult. 

I did a test fit of the rear window. My first attempt was a bit lazy, figuring that it isn't really meant to be precise anyway, and that you needed to adjust just like in the earlier models. I marked where the glass touched the support attachment so that I can cut notches into the plexi. Luckily I slept on my effort before cutting. 

The next morning I started again and made sure that the center hole was aligned and that the distances that you need to measure were as close to equal as possible. It turns out that the shipped part is fairly close and while I will need to do some additional trimming perhaps, doing it a second time and taking my time paid off and will allow me to not have to shave as much off the front of the rear windshield when the time comes. 

I have started to cut the notches and am smoothing out the plexiglass now. The dremel bit does get away from you quickly even at low speed so you really need to hold it tight as you are working. These parts are between $700-$1300 if you need to replace them so I am going to do everything I can to avoid any cracking.


Wednesday, May 25, 2022

Flap Actuation work

I am posting to bring things up to date a bit. I have received the finish kit, and it looks like the propeller will be here in October and the engine next year (2023). I am in no need for either of them as I have a ton of work to do, but the fuselage kit is coming to an end over the next month or so.


 Chapter 34 is a short one, but it starts with drilling the flap controls using the wing alignment template. I got creative a bit with the clamping using a board to secure things while I drilled the first hole and inserted a cleco. I also used BoLube on the drill bits which really helps a lot when drilling through the steel tubes. 

I sprayed primer into the tubes after, and let them dry.


I also drilled the hole for the flap position sensor, luckily in the RV-14 online blog it was mentioned to drill this now before installation. 

A lot of work has been done besides this, I just haven't blogged much. I was using the EAA builders log and was optimistic about it but it is just too rough around the edges, and seems frozen in web 1.0 land with not much improvement on the horizon. So I will stick with this blog.

Monday, May 16, 2022

Brake Lines

 I have been doing quite a bit of work on the plane over the last month since the finish kit arrived. Inventory is complete and there are a few things on backorder including the baffles which I won't need for a long time. There were a few things missing in the finish kit but no more than small hardware and a few bolts that were the wrong size (check everything - This happened on the fuselage kit as well - if it says three bolts/screws of a certain size make sure all of them are the same size).

I ordered one of the new gas struts for the canopy and asked that it be shipped with the other backorders. Vans recently introduced a new stronger strut so I figure it is best to install the stronger one at the beginning.

Over the last couple of weeks I have built the rudder pedals including painting them with rustoleum hand hammered silver color and they look great in my opinion. I ordered the brake cables from Aircraft Specialty as well. Steve is a great resource and really goes the extra mile to help if you have any questions. The cables are quite expensive but after receiving them I can see why. They are all stainless fittings, and quite strong. I am glad that I have them rather than the clear tubing.

You need to put thread seal on all NPT threads like these, so I used Permatex #2 which I had a tube of from a little while ago. The clocking of the fittings on the master cylinders is a little difficult to get as some of the fitting need to be torqued quite tight. But once you get it, everything really comes together quickly.

Saturday, April 16, 2022

Finish Kit Inventory

 The finish kit arrived a little less than two weeks ago and I have been diving deep into the inventory. I bought a couple more organizers from Harbor Freight and there are lots of unique parts but also a lot of the same hardware that I combine into the existing storage I have. One of the things I really love about this project is getting more familiar with all the hardware and uses, etc. It does give me more confidence as I get towards the systems portion of the build.

Monday, March 28, 2022

Baggage Floors

 Vacuumed out the floor area, tightened some bolts, and clecoed the floor boards in. Next step will be to rivet everything in place


Wednesday, March 23, 2022

Finish Kit has shipped!

 The finish kit will be here next week! Better hurry up and make room.

Sunday, March 20, 2022

Finishing up last items


I am using the Aircraft Specialty pre-made fuel lines. Today I did a little work on securing the fuel lines that go from the selector to the wing root using small plastic clips and screws.

Saturday, March 12, 2022

Engine and Prop ordered!

 With prices rising yet again, I went ahead and ordered the engine. Initially I was going to do this prior to the previous price hike last summer but waited and missed the deadline.

Throughout the life of this project, I have looked at the costs and mentally tried to prepare for the back end financial loading of a project like this. Now that I have pulled the trigger in a more rapid fire fashion than anticipated I am running down to the garage to get moving!

I ordered the two blade Hartzell 74" prop, and the non Thunderbolt EXP119 engine with accessory pad.

Finish Kit is shipping soon!

 My original date for the shipping of the finish kit was supposed to be in January, however Vans has been having a lot of well publicized issues fulfilling orders.

This was perfectly acceptable to me, I was ready to settle in for the next few months and finish the Fuselage (I only have a couple of chapters left - mostly controls, and a few misc items) and perhaps work on wiring.

Well leave it to fate to kick me in the butt and accelerate things again. I was told a couple of weeks ago that my order is now going to be ready for crating so I need to pay the balance. I went ahead and did that with the understanding that it still could take several months to crate and ship. Not so fast, a week after paying the crate date was just updated and it is crating in a couple of weeks! This is just what I need to get motivated again.