Since the last post, I have completed the priming of the ribs and flap brackets. I used Sherwin Williams P60G2 which I really like once you get the hang of it.
I chose to use a small Harbor Freight gun which is really a touch up gun and only holds 4 OZ of mixture. It has a .8 mil tip and seems to work well. You do end up having to reload quite a bit but I have found so far that the overspray is minimal and it not that inconvenient to mix again. I may invest in a larger gun but for now this will do. Initially I had too thin a coat of primer on there. I could feel it but there was no real noticeable green color. I resprayed and am happier with the coverage.
For the flap brackets I first started with the Pneumatic Squeezer which I found to be difficult for this in terms of reach and my ability to align everything straight. I went back to a method which I really like a lot which is to backrivet using a c-frame. It keeps everything aligned and gives me more control. I did notice that there seems to be a small gap between the thick flap material and the rib on at least one rib so far, so I am going to again check that the flap brackets are flat/straight.
Pictures will be up when I have some more time.
Monday, June 2, 2014

Sunday, May 11, 2014
Wing Ribs Complete
Ribs complete!
Since my last post I have completed the prep of the ribs and also started deburring and preparing the flap brackets and all other small pieces for the rib attach. My thought is to prime all at once.
I am using the Sherwin Williams P60G2 Wash primer, and am going to use a small Harbor Freight gun given the smaller compressor that I have. This should do the trick for the priming.
The ribs were very tedious and it seemed for a while that I was repeating steps and doing things inefficiently until one day I just found a rhythm that worked for me. I did each rib individually rather than batch together each process and repeat the same thing for each rib. The only exception to that was the drilling. I used a reamer to ream all the #40 holes on all the ribs with the exception of the portion of the flange that slides into the spar.
I spent a lot of time worrying about how to debur the small tabs on the ribs, until I realized that running them through the corner of a soft scotchbrite wheel quickly did most of the job. You don't want to leave it on there for long though as you run the risk of weakening the material and grinding too much but the corner of the wheel does make it in the gap and remove the majority of the burrs. Anything left over I used the 240 grit emery cloth for.
I bought a Black and Decker RX dremel clone for $29 which works great, but did not find the deburring bits to be useful at all. It came in very handy though for trimming the tip flange off of the outboard wing ribs though. Do yourself a favor and get a full face shield if you are doing any cutting like this. Debris can go everywhere and your eyes come in handy for later.
The ribs take a long time because for each you need to:
- 'break the edges' - ie bevel each of the edges a bit to remove the burr.
- Remove the cut marks from the edges with a wheel + scotchbrite pad or sandpaper
- Bend the edges to 90 degrees
- Deburr all the flange crevaces
- Flute the ribs so that the web lies flat (not the whole rib just each flange/web)
- Drill all holes to #40
- Deburr the holes you drilled
- Dimple the holes
I would estimate that it took a minimum of 15-20 hours for all of that spread over several sessions. The last session that really got things moving was five hours long and that provided motivation to complete the task, as prior to that I at least could understand why the Quickbuild makes sense. I am sure I will write something similar when it comes time for the tanks :( It is about the journey though of course :)
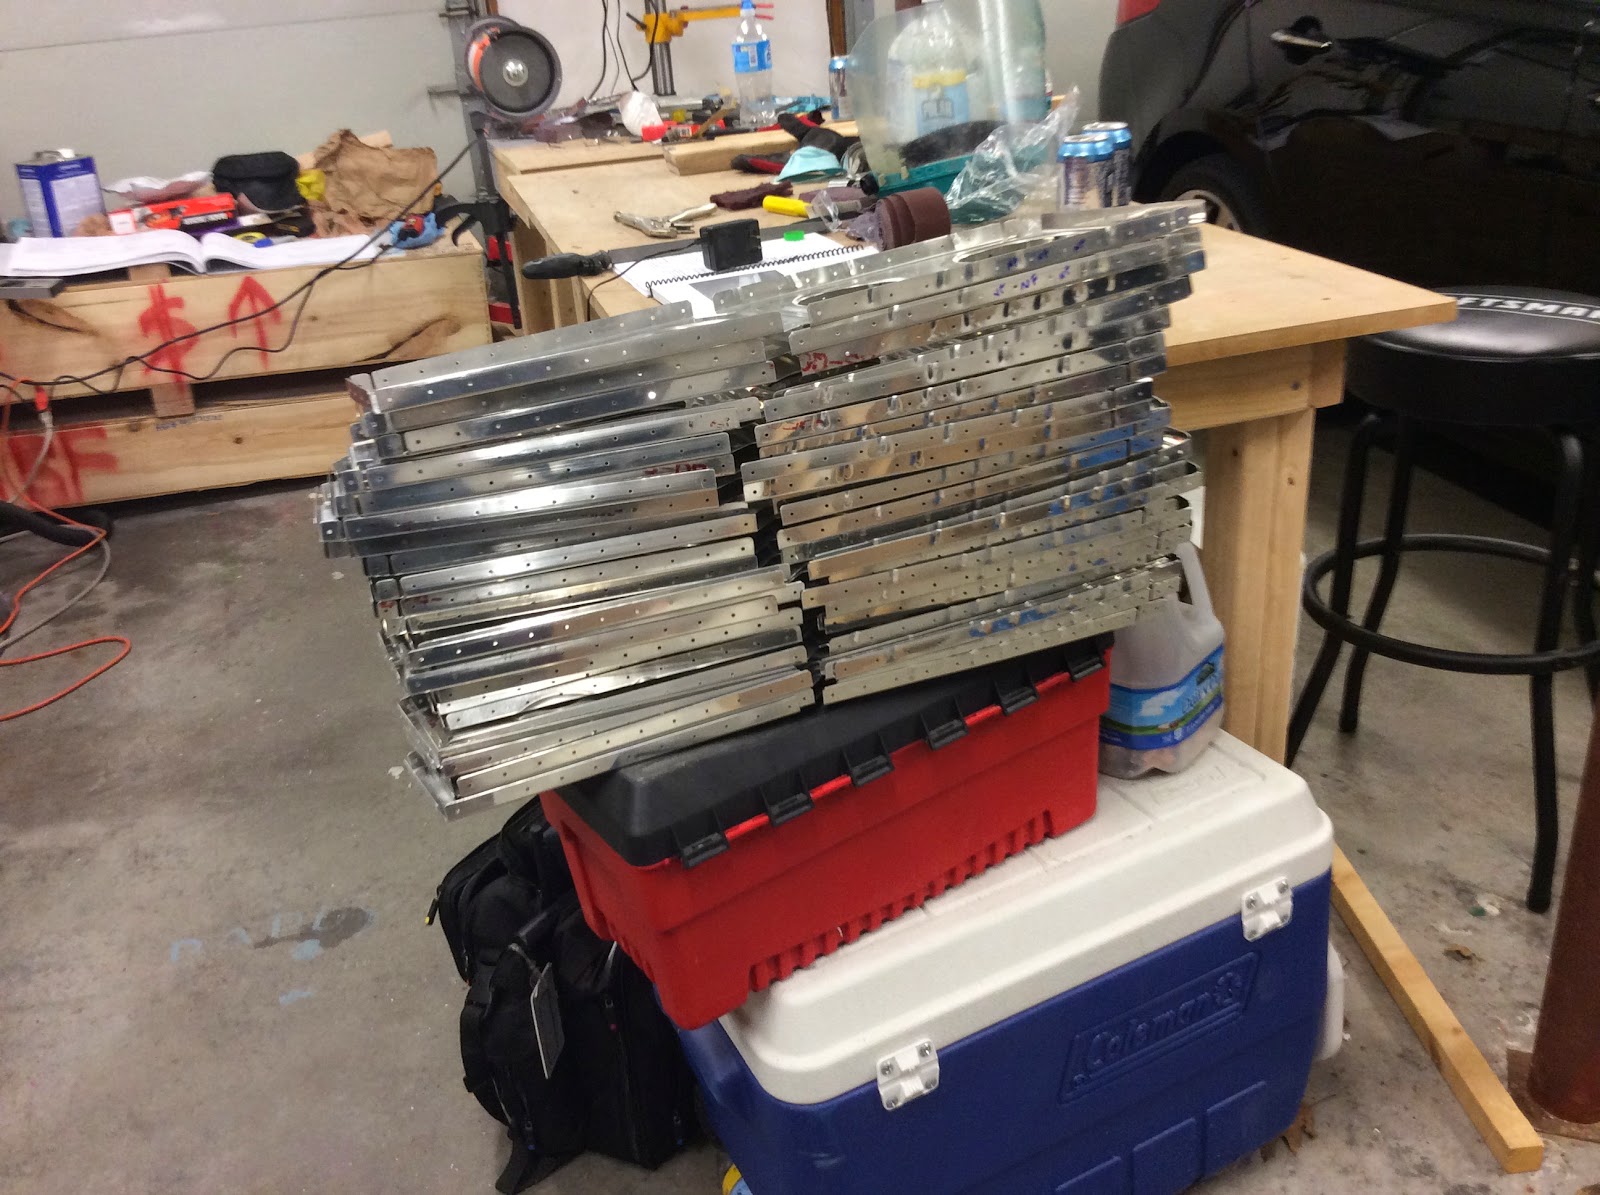
For all that work, I have a single picture to show the end product. This picture was taken just before I dimpled.
Since my last post I have completed the prep of the ribs and also started deburring and preparing the flap brackets and all other small pieces for the rib attach. My thought is to prime all at once.
I am using the Sherwin Williams P60G2 Wash primer, and am going to use a small Harbor Freight gun given the smaller compressor that I have. This should do the trick for the priming.
The ribs were very tedious and it seemed for a while that I was repeating steps and doing things inefficiently until one day I just found a rhythm that worked for me. I did each rib individually rather than batch together each process and repeat the same thing for each rib. The only exception to that was the drilling. I used a reamer to ream all the #40 holes on all the ribs with the exception of the portion of the flange that slides into the spar.
I spent a lot of time worrying about how to debur the small tabs on the ribs, until I realized that running them through the corner of a soft scotchbrite wheel quickly did most of the job. You don't want to leave it on there for long though as you run the risk of weakening the material and grinding too much but the corner of the wheel does make it in the gap and remove the majority of the burrs. Anything left over I used the 240 grit emery cloth for.
I bought a Black and Decker RX dremel clone for $29 which works great, but did not find the deburring bits to be useful at all. It came in very handy though for trimming the tip flange off of the outboard wing ribs though. Do yourself a favor and get a full face shield if you are doing any cutting like this. Debris can go everywhere and your eyes come in handy for later.
The ribs take a long time because for each you need to:
- 'break the edges' - ie bevel each of the edges a bit to remove the burr.
- Remove the cut marks from the edges with a wheel + scotchbrite pad or sandpaper
- Bend the edges to 90 degrees
- Deburr all the flange crevaces
- Flute the ribs so that the web lies flat (not the whole rib just each flange/web)
- Drill all holes to #40
- Deburr the holes you drilled
- Dimple the holes
I would estimate that it took a minimum of 15-20 hours for all of that spread over several sessions. The last session that really got things moving was five hours long and that provided motivation to complete the task, as prior to that I at least could understand why the Quickbuild makes sense. I am sure I will write something similar when it comes time for the tanks :( It is about the journey though of course :)
For all that work, I have a single picture to show the end product. This picture was taken just before I dimpled.
Monday, April 28, 2014
Update, Chapter 13 complete
Just to update everyone on the project status:
- Chapter 13 complete
This consisted of LOTS and LOTS of countersinking. In my previous project I had used the air drill for this purpose, however this time around I took the good advice of other builders and invested in a decent cordless drill (DeWalt 20V Max). Makes a big difference. Also invested in a WEN drill press which despite being imported and inexpensive appears to be well built.
Ended up with one countersink cage with a wobble in it, but Cleveland tools exchanged that quickly for me.
Still have one rivet I am not happy with on the nutplates but from what I understand the rivets really are there to hold the nutplate in place, and it is the bolt/screw itself that is the real structural member here.
One particular set of rivets I had a tough time with were the fuel tank attach nutplates in the middle of the spar. No matter what I tried, I constantly ended up with a proud factory head. I am going to invest in a flush set without the rubber ring in the hopes that it will help here. Another builder mentioned the ones with the rubber ring typically are better for the wing skins. I solved this riveting problem by using the c-frame to rivet which is a trick I have used before for difficult to set rivets.
After completing chapter 13, I built a simple wing rack so that I can get the spars out of the way and begin the wing rib prep. Other builders have said that it is workable to have the wings this close together, however I am still worrying about access when I start to rivet on the skins. Most likely I will have to go back to putting the wings on a table at that point for riveting. One step at a time.
Here are some pictures! Send some feedback if you are reading this, would be curious to know what you think.

- Chapter 13 complete
This consisted of LOTS and LOTS of countersinking. In my previous project I had used the air drill for this purpose, however this time around I took the good advice of other builders and invested in a decent cordless drill (DeWalt 20V Max). Makes a big difference. Also invested in a WEN drill press which despite being imported and inexpensive appears to be well built.
Ended up with one countersink cage with a wobble in it, but Cleveland tools exchanged that quickly for me.
Still have one rivet I am not happy with on the nutplates but from what I understand the rivets really are there to hold the nutplate in place, and it is the bolt/screw itself that is the real structural member here.
One particular set of rivets I had a tough time with were the fuel tank attach nutplates in the middle of the spar. No matter what I tried, I constantly ended up with a proud factory head. I am going to invest in a flush set without the rubber ring in the hopes that it will help here. Another builder mentioned the ones with the rubber ring typically are better for the wing skins. I solved this riveting problem by using the c-frame to rivet which is a trick I have used before for difficult to set rivets.
After completing chapter 13, I built a simple wing rack so that I can get the spars out of the way and begin the wing rib prep. Other builders have said that it is workable to have the wings this close together, however I am still worrying about access when I start to rivet on the skins. Most likely I will have to go back to putting the wings on a table at that point for riveting. One step at a time.
Here are some pictures! Send some feedback if you are reading this, would be curious to know what you think.
Saturday, March 29, 2014
Inventory Complete
I have reorganized the garage, and the inventory of the Wing and Tail kits is complete. I didn't count every single small screw but the only discrepancy I could find was an extra hardware bag of a few bolts and washers.
I have settled on what I am going to do for a wing rack. Planning on using the one that Derek used for his project.
I still need a few tools and need to decide on a drill press.
Setup is complete for the project start, the Left wing spar is on the bench and just about ready for the start of Chapter 13 :)
I have settled on what I am going to do for a wing rack. Planning on using the one that Derek used for his project.
I still need a few tools and need to decide on a drill press.
Setup is complete for the project start, the Left wing spar is on the bench and just about ready for the start of Chapter 13 :)
Tuesday, March 25, 2014
Kits have arrived!
I guess I got what I wanted, both kits arriving at the same time.
All three crates arrived in perfect condition via ABF yesterday. Here is the issue I have: SPACE.
My plan is to start with the wings first, so that I can build them and get them out of the way as in move them to another garage that I have available (but far away). My problem is that I don't really have a good place to store all the large skins while I am building other than in the crates. The crates take up valuable building space.
So I will take a bit as I do inventory to figure out how I am going to juggle all of the pieces here and leave enough room to build. Good problems to have as they say :) What I am considering doing is combining the skins into one crate if possible and shelving all of the other parts. That way at least I can get rid of one crate. Another alternative will be to inventory the tail kit, and then move that crate to another garage until I am ready for it.
Pictures will be up soon.
All three crates arrived in perfect condition via ABF yesterday. Here is the issue I have: SPACE.
My plan is to start with the wings first, so that I can build them and get them out of the way as in move them to another garage that I have available (but far away). My problem is that I don't really have a good place to store all the large skins while I am building other than in the crates. The crates take up valuable building space.
So I will take a bit as I do inventory to figure out how I am going to juggle all of the pieces here and leave enough room to build. Good problems to have as they say :) What I am considering doing is combining the skins into one crate if possible and shelving all of the other parts. That way at least I can get rid of one crate. Another alternative will be to inventory the tail kit, and then move that crate to another garage until I am ready for it.
Pictures will be up soon.
Tuesday, March 18, 2014
More Prep
Have been cleaning out the garage in preparation for the arrival of the kits this week. It looks like I will need to unpack and dismantle most of the two large crates so that I can have space for the wing stand when I eventually get to that stage.
The long crate will be able to stay intact out of the way, so most long pieces I can keep in there still until they are needed. I will figure out what to do with the skins shortly after I see how big each one is.
Have been spending some time figuring out if I want to use the Cleaveland Substructure dies or just get a tank die and use that on the substructure. I will also need a few more odds and ends, like dies for the screw holes. I ordered the roloc pads for edge deburring, as a fellow builder recommended them more than the wheel I had been using, especially for the wing ribs.
I have also figured out what I am going to do for the Wing spar prep. Both my regular EAA table as well as the smaller but same height table I currently have my bandsaw on will go together and will provide enough length for the spar while I am countersinking, etc.
Stay tuned!
The long crate will be able to stay intact out of the way, so most long pieces I can keep in there still until they are needed. I will figure out what to do with the skins shortly after I see how big each one is.
Have been spending some time figuring out if I want to use the Cleaveland Substructure dies or just get a tank die and use that on the substructure. I will also need a few more odds and ends, like dies for the screw holes. I ordered the roloc pads for edge deburring, as a fellow builder recommended them more than the wheel I had been using, especially for the wing ribs.
I have also figured out what I am going to do for the Wing spar prep. Both my regular EAA table as well as the smaller but same height table I currently have my bandsaw on will go together and will provide enough length for the spar while I am countersinking, etc.
Stay tuned!
Thursday, March 13, 2014
Kits en route already
Just got word from Vans that the kits have shipped, so now I need to get moving on re-organizing the garage/workshop. It will be tight but because I am starting with the wing kit I should be able to complete those and then move the wings to another location.
I have emailed a few builders to see what they did for the wing stands while building.
I have emailed a few builders to see what they did for the wing stands while building.
Subscribe to:
Posts (Atom)